Provo Craft's Fingerless Gloves pattern
9/18/06 update: I got a note back from Clella at Provo Craft today. She agreed there was an error in the pattern on step 2 and that the decreases should only be on the thumb extension side of the glove.
There's been some discussion on the Michaels KK Teacher's board about the Provo Craft pattern for fingerless gloves that we were given as a demo project. The pattern seemed to be confusing, and IMO, has an error. The following are my summarized directions and comments (italicized) on the pattern (left hand only). I used two strands of variegated worsted weight yarn, and the glove is plenty warm!
Step 1: Cast on to 19 pegs. Peg 2 is to the right of peg 1. Knit as a flat piece for 12 rows. This is the part that covers the fingers. I would do 6 rows only.
Step 2: From peg 1, wrap pegs 24 – 20 for the thumb extension. Knit from peg 20 – 24, then 1 – 19. Do NOT decrease one loop here! Knit back from 19 – 1, then 24 – 21. Move the loop from peg 20 to peg 21 to decrease one peg. Keep knitting back and forth as a flat piece, decreasing one peg on the thumb extension side each time, until you are back to knitting pegs 1 – 19.
Step 3: Knit two rows on pegs 1 – 19.
Step 4: Switch yarns and knit 3 more rows. Bind off with a flat method. This creates a contrast cuff. The different yarn also gives the cuff a looser bound-off edge. I didn’t change yarns for the wrist cuff.
Here is what the finished knit piece looks like:

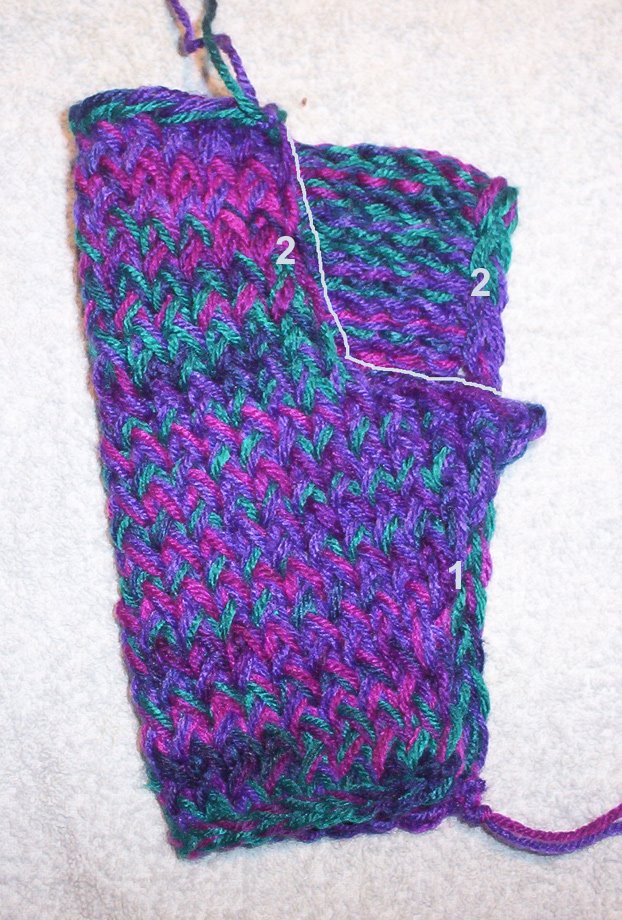
The cast on edge is at the bottom, the thumb extension is on the left, and the bound off edge is at the top.
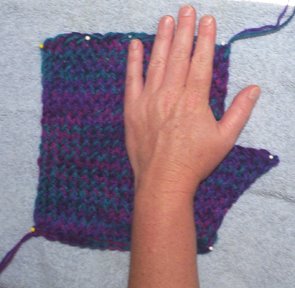
The piece is knit upside down; the cast on edge goes at the finger tips, the bound off edge goes at the wrist.
You can see here how the piece will fit on the hand.
Step 5: Sew up the sides. The white line shows the edge of the knit piece. Sew up from the wrist to the top of the thumb extension (1). Then sew the seam along the index finger (2).

Here is how the glove looks on. I didn’t tack the three spots along upper edge between the fingers (step 9) as the glove is too big for me.
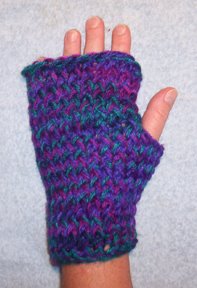
I would definitely make the glove shorter at the top, and longer at the bottom. I don’t like the tightness of the wrist, but I didn’t change to a stretchier yarn, either. I think it would turn out well with those changes, and it really is comfortable.
There's been some discussion on the Michaels KK Teacher's board about the Provo Craft pattern for fingerless gloves that we were given as a demo project. The pattern seemed to be confusing, and IMO, has an error. The following are my summarized directions and comments (italicized) on the pattern (left hand only). I used two strands of variegated worsted weight yarn, and the glove is plenty warm!
Step 1: Cast on to 19 pegs. Peg 2 is to the right of peg 1. Knit as a flat piece for 12 rows. This is the part that covers the fingers. I would do 6 rows only.
Step 2: From peg 1, wrap pegs 24 – 20 for the thumb extension. Knit from peg 20 – 24, then 1 – 19. Do NOT decrease one loop here! Knit back from 19 – 1, then 24 – 21. Move the loop from peg 20 to peg 21 to decrease one peg. Keep knitting back and forth as a flat piece, decreasing one peg on the thumb extension side each time, until you are back to knitting pegs 1 – 19.
Step 3: Knit two rows on pegs 1 – 19.
Step 4: Switch yarns and knit 3 more rows. Bind off with a flat method. This creates a contrast cuff. The different yarn also gives the cuff a looser bound-off edge. I didn’t change yarns for the wrist cuff.
Here is what the finished knit piece looks like:

The cast on edge is at the bottom, the thumb extension is on the left, and the bound off edge is at the top.
The piece is knit upside down; the cast on edge goes at the finger tips, the bound off edge goes at the wrist.
You can see here how the piece will fit on the hand.

Step 5: Sew up the sides. The white line shows the edge of the knit piece. Sew up from the wrist to the top of the thumb extension (1). Then sew the seam along the index finger (2).
Here is how the glove looks on. I didn’t tack the three spots along upper edge between the fingers (step 9) as the glove is too big for me.

I would definitely make the glove shorter at the top, and longer at the bottom. I don’t like the tightness of the wrist, but I didn’t change to a stretchier yarn, either. I think it would turn out well with those changes, and it really is comfortable.
posted by Anne at 11:13 PM
![]()


0 Comments:
Post a Comment
<< Home