Thursday, March 29, 2007

Felting -- Folly or Fun?

I've joined in the felting frenzy, mostly because students keep asking me about it. Several weeks ago, I knit up a bag on the yellow loom. It was a very simple knit -- e-wrap all the way. I wanted to add some stripes for interest, and thought I'd try to blend the colors when changing them. I added a tab at the top with a button hole for a small flap closure, and decided to attach purchased handles instead of knitting a strap. I also sewed a flat bottom so the bag would stand up.


In the washer, I checked it every few minutes, and the felting seemed to be going pretty slowly. The columns of stitches (e-wraps) were felting, but there were gaps in between the columns (traveling yarn, also called bars), so I just let it stay in for the whole cycle. I was going to throw it into the dryer if necessary -- my wool sweaters have felted wonderfully in the dryer, especially when I didn't mean to put them in there -- but the bag looked pretty good at the end of the wash cycle. The columnar texture was still there, rather like large wale corduroy, and I didn't want the bag to get any smaller.

I put a plastic bag in it and stuffed it with newspapers, but it was kind of lumpy and I didn't want my bag to look shapeless.


Then I spied a Cream of Wheat box that looked to be just the right size, and figured I'd get a cleaner shape to my bag if it dried around the box. I was also able to shape the bag so the columns would be perpendicular, not twisted or biased.


The tab was off center, and I decided this bag would be perfect for carrying a couple water bottles. I drink a lot of green tea, and don't mind if it's at room temperature, so this will be designated as my "tea bag." The button tab wasn't long enough to reach over the bottles, so I cut it off. You can barely tell where the tab was; the top edge is rounded but the cut edge was flat. I wet that spot and massaged it with my fingers for a few minutes to soften the cut area. Then I knit and felted a long strap to sew on to the two short sides of the bag. The felting of the strap took two complete wash cycles. From what I've read, smaller pieces take longer to felt than larger pieces. Still, no purchased handles or button needed after all!


Just to spruce it up a bit, I added a blanket stitch around the edges.


A few things I learned:

  • There was a definite bias to the knitting. When I put the box into the bag for the drying process, I was able to shape the bag so it didn't look twisted.

  • I don't like the "gradual" color change. I will make the color stripes be more distinct with the next bag.

  • I forgot about the "stepped" look to the color change when knitting in the round. Next time, I will slip the last stitch of the dropped color to avoid the obvious shift.

  • The bag shrank more in circumference than in height.

  • The tab closure seemed to be centered before felting, but got off center during felting. I'm not sure how that happened; I thought I counted columns, but maybe I eyeballed it. Next time, I'll have to triple check the position of the tab when sewing the bottom.

  • There appears to be an extra row of stitches on one side of the tab because of the tab being created at the end of the last circular row. I still like the idea of a button-down flap, but next time I'll knit it separately and sew it on afterward.

  • Felting doesn't hide flaws. But tails that stick out can be trimmed.

  • The two sides of the bag didn't stick together during felting. Next time -- pockets!


  • I still want a button-tab bag with short handles, so I'll be knitting up another. Stay tuned!

    Sunday, March 18, 2007

    No SSS!

    I've knit so many slippers, trying out different designs, sizes, yarns, etc. that Single Slipper Syndrome runs rampant at my house. I finally have a completed pair. Not only that, they are mine!


    I made this pair with one strand of variegated and one strand of solid colored worsted weight yarn used together, and the pair took less than one skein of each. They are very inexpensive to make, and they fit quite comfortably. This free easy pattern is available on my website.

    Sunday, March 11, 2007

    Using a yarn tool

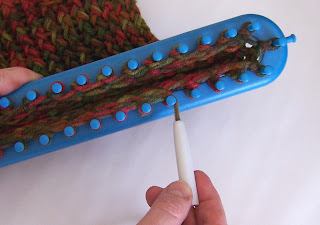
    One of the techniques people use to keep from wrapping their yarn too tightly around the loom's pegs is to use a yarn tool. Provo Craft makes some (top row center) , though a 3-4" length of a drinking straw is a similar option.

    Last Spring, I loom knit five youth and adult size sweaters in three months, all using two strands of Red Heart worsted weight yarn. I know many people rave about that yarn. It certainly is inexpensive for a large quantity of yarn, and comes in about any color you can imagine. However, I have a hard time working with that yarn for larger projects as it dries out my fingers terribly, to the point where my cuticles crack and bleed no matter how much lotion/lanolin/beeswax I use.

    A while ago, in a moment of forgetfulness, I bought a large quantity of Red Heart variegated worsted with gorgeous jewel tone colors, perfect colors for me! It just jumped into my arms and whispered in my ear how it needed to be a sweater for me. It sat in a bag in a corner for a few months, patiently waiting. Now I think enough time has passed since I last knitted a sweater that I'm finally up to knitting another: no small project! I knit up my gauge swatch, sketched out the design and calculated rows, stitches, decreases, etc. I cast on a few days ago, but first, I threaded one of those yarn tools onto the yarn!

    What I have discovered is that the yarn tool works really well for e-wrap stitches, because you wrap all the pegs in the row, then go back and knit off. For stockinette (flat) and purl stitches, it just gets in the way. I also discovered that I wrap the pegs much tighter with the tool than when I use my fingers! So I've come up with a way to wrap the pegs to still maintain an even and looser wrap. When I e-wrap the peg, I start from the inside of the loom, wrap around the peg, and end up back on the inside of the loom. Instead of just wrapping around the peg, I pull the yarn tool past the peg and away from the loom, then come back on the other side of the peg to the inside of the loom. This adds enough play to the yarn to keep the wraps from being too tight.


    I also discovered a bonus: I can wrap the loom much faster using the tool than doing it by hand. And so far, the tool has been wonderful in protecting my fingers from the yarn.

    Thursday, March 08, 2007

    Recycling Yarn & A Tip

    The idea of recycling yarn has intrigued me for some time. When I saw this sweater in a thrift store, I knew the yarn was meant to be something else.


    First, I recognized the yarn to be Lion Wool-Ease Thick and Quick. A check of the seams confirmed it was beautifully hand crocheted. And it appeared to be recently completed -- no wear or pilling. A discarded Christmas gift perhaps? I even tried on the sweater, and immediately discovered why it was at the thrift store. First, the obvious -- the yarn is just too warm for a garment worn indoors. But the clincher was the beautiful trim -- it had no stretch to it. It constricted the wrists and hips. That sweater begged me to take it home and give it a new life. So I did.

    I happened to disassemble it at work. My coworkers watched askance as I took apart the pieces, then proceeded to unravel them. My arm got tired from swinging back and forth as I pulled the yarn away from the sweater, but I kept on. In the end, I had over 2 pounds of yarn! What a great deal for a $3.50 investment!


    In the process of liberating the yarn, I discovered the answer to a pesky problem I've been having. Even though I weave in my yarn tails and trim them close to the knitting, over time they work loose just enough to stick out. The crocheter of this sweater showed me the solution: use sewing thread and teeny stitches to tack that yarn tail down.

    So what will this yarn be reincarnated as? I've knit up a fun hat and scarf set, but it won't debut until this fall. The rest is waiting patiently, requests welcome.

    Thursday, March 01, 2007

    Loom Knitter's Circle magazine premier

    Today, the premier issue of Loom Knitter's Circle magazine hit the web. Denise Layman and Isela Phelps did an incredible job of collecting relevent articles and patterns to share with the loom knitting community. Be sure to check it out, and add your name to the mailing list to be updated when each quarterly issue becomes available.